The first time I tasted a brown sugar shaken espresso from a proper cafe, I was struck by two things: the deep, almost caramelized sweetness that didn’t cloy, and the impossibly velvety foam crown that floated above the ice like a cloud. It wasn’t just an iced coffee — it was a textural experience. The secret, I learned, isn’t in the shaking alone, but in how you handle the brown sugar and the espresso before they ever meet the ice. Here’s exactly how to replicate that at home, step by step.
The Right Ratio: Why 18:36 Matters
Start with your espresso. I use 18 grams of freshly ground coffee (fine, like table salt) and pull 36 grams of liquid in 25 to 30 seconds. This 1:2 ratio is the foundation. If your shot runs faster than 25 seconds, grind finer; if slower, grind coarser. The goal is a balanced extraction with enough body to hold up against ice and sugar. A sour or bitter shot will ruin the drink — no amount of shaking can fix that.
Dissolving Brown Sugar: The Step Everyone Skips
Brown sugar is not simple syrup. It’s clumpy, sticky, and resistant to dissolving in cold liquid. To get that even sweetness throughout the drink, you need to pre-dissolve it. In a small bowl, combine 2 tablespoons (packed) of brown sugar with 2 tablespoons of hot water — just off the boil, around 200°F (93°C). Stir until the liquid is clear and no grains remain. This takes about 30 seconds. Pour this syrup directly into your shaker.
Common mistake: adding brown sugar directly to the shaker with espresso and ice. The sugar will sink to the bottom, leaving you with a bitter first sip and a syrupy last gulp. Pre-dissolving avoids that entirely.
The Shake: 12 Seconds of Precision
Now add your hot espresso to the shaker with the brown sugar syrup. Then add 6 to 8 ice cubes — about 1 cup. Seal the lid tightly and shake. Not gently. Not casually. Shake with purpose for exactly 12 seconds. You’ll hear the ice clattering against the metal, and after about 8 seconds, the shaker will start to frost on the outside. That’s the sign that the emulsion is forming.
Why 12 seconds? Shorter than that, the espresso doesn’t aerate enough to create the foam. Longer, and the ice dilutes the drink too much. The 12-second mark is the sweet spot where you get a thick, creamy foam layer on top without watering down the coffee.
What to Look For
When you open the shaker, the liquid should be a uniform caramel color, with a layer of fine bubbles on top. If you see large, irregular bubbles, you shook too gently. If the foam is thin and watery, you shook too long. The ideal foam should be dense enough to hold its shape on the surface of the drink for at least 30 seconds.
Pour and Top: Preserving the Foam
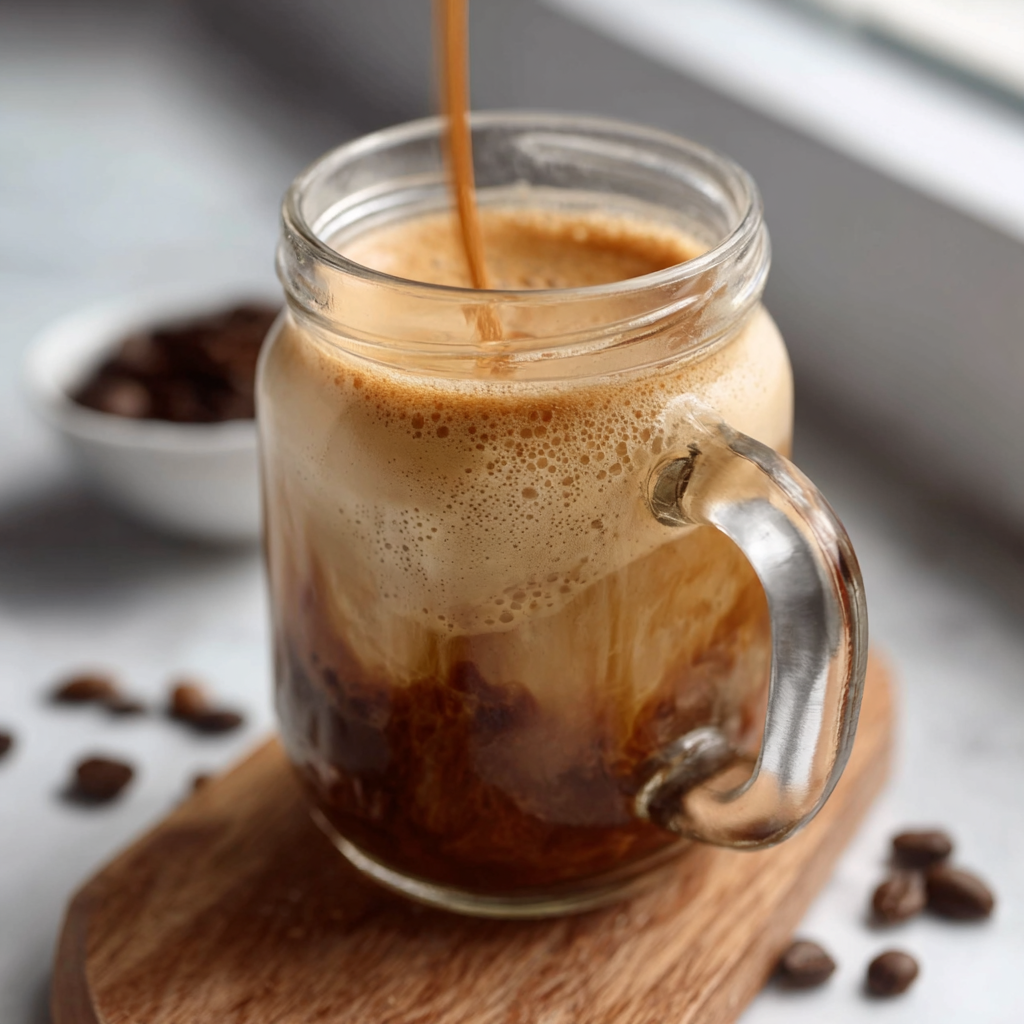
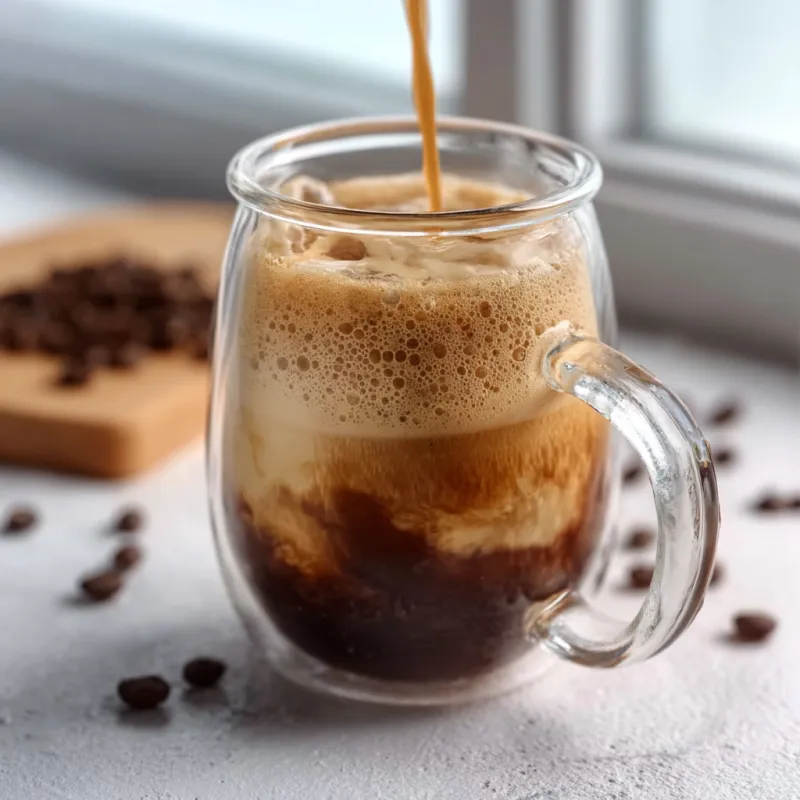
Pour the entire contents of the shaker — ice and all — into a tall glass. Don’t strain out the ice; it’s part of the drink. Now, the milk. I use whole milk for the richest mouthfeel, but oat milk works beautifully too (look for barista blends). Pour 4 ounces (120ml) of cold milk over the back of a spoon held just above the foam. This gentle pouring technique keeps the foam intact; if you pour directly, the milk will punch through and mix everything into a uniform brown.
The result is a drink with three distinct layers: a dark espresso base, a lighter middle where the milk and coffee blend, and a creamy foam cap on top. Stir it if you want, but I recommend drinking it as-is through a straw for the full textural journey.
Why This Works: The Science of Emulsion
The shaking action does more than chill the coffee. It emulsifies the oils from the espresso with the water and sugar, creating a stable foam. The brown sugar’s molasses content adds viscosity, which helps the bubbles hold their structure longer than they would with white sugar. This is why the foam on a brown sugar shaken espresso is thicker and more persistent than on a regular iced latte.
The Takeaway
A cafe-worthy brown sugar shaken espresso at home comes down to three non-negotiable steps: a properly pulled 18:36 espresso shot, fully dissolved brown sugar syrup, and a precise 12-second shake. Skip any of those, and you’ll end up with something closer to a sweet iced coffee — pleasant, but not the layered, velvety drink you’re after. Master these details, and you’ll never need to queue at a cafe for this one again.
Note: Caffeine content varies by bean and brew strength. If you have specific health concerns or are pregnant, consult a qualified professional before increasing your caffeine intake. This drink is not suitable for young children.
Frequently Asked Questions
Can I use regular white sugar instead of brown?
Yes, but brown sugar adds a deeper, molasses-like sweetness that mimics the cafe version. White sugar will work but the flavor will be simpler.
Why do I need to dissolve the brown sugar in hot water first?
Brown sugar crystals are larger and stickier than white sugar. Dissolving them in hot water ensures they blend evenly into the espresso instead of sinking to the bottom.
What if I don’t have an espresso machine?
Brew 2 ounces of very strong coffee (use a 1:4 coffee-to-water ratio instead of the usual 1:16) and treat it like espresso. The result won’t have crema, but the flavor will still be bold.
Brown Sugar Shaken Espresso
Ingredients
Equipment
Method
- Brew two shots of espresso (18g in, 36g out in 25-30 seconds) into a small cup. 2. In a separate small bowl, dissolve 2 tablespoons packed brown sugar in 2 tablespoons hot water (200°F/93°C) until no granules remain. 3. Pour the brown sugar syrup into a shaker or mason jar. 4. Add the hot espresso to the shaker. 5. Fill the shaker with 6-8 ice cubes (about 1 cup). 6. Secure the lid tightly and shake vigorously for exactly 12 seconds — you should hear the ice clattering and see the shaker become frosty. 7. Pour the entire contents (ice and all) into a tall glass. 8. Top with 4 ounces (120ml) cold milk, pouring gently over the back of a spoon to preserve the foam layer. 9. Serve immediately with a straw.